So, you’re considering getting into film photography. That’s awesome. You should. There are so many great film cameras out there that you may have a hard time choosing which route to go. Hopefully, some of the content on this site can help you make an informed decision. But once you’ve got the camera and an exposed roll – or sheet – of film under your belt, you’ve got to decide what your next steps are. There are two directions you can go at this point:
- Traditional analog printing methods
- Analog/digital hybrid of digitizing your film to edit and print
There’s a lot to be said regarding the first method. If you’ve never spent time in a darkroom and watched that image come up on the paper in that tray, you don’t know the excitement that can bring. Traditional printing is very tactile. It smells funny, it’s wet, and it’s darkness illuminated by dim red lights. Oh, the absolute joy! But there’s one significant requirement for doing this: a darkroom. If you’re like me, though, and short on free space to put a darkroom together, you’re most likely looking to use the second method – film digitization.
At this point I need to point out that the process of developing film does not require a darkroom. So if not having a darkroom is keeping you from exploring film photography, don’t let it. You can always send your film to a lab for developing – or, if you’re the adventurous type – process it yourself. Once you have the developed film in hand, though, how do you get it converted to something you can work with on your computer?
There are two basic methods for this: using a film scanner; or, using your digital camera to digitize your film. A film scanner is a great option, but they can be rather expensive if they’re any good. And many of them are dedicated to scanning 35mm film only. If you’re shooting medium or large format you’ll need to keep looking. Currently, there are only a few options that can accommodate these larger film sizes – Pacific Image PF120, Epson Perfection V600. And really only ONE option if you’re shooting large-format sheet film – Epson Perfection V850. (I’ll point out that these are your home-based options. For the absolute best quality scans of your film, drum scanning is the go-to method. But it can be prohibitively expensive if your shooting film mostly as a hobby).
I have used the Epson Perfection scanners in the past, and I like them when paired with the right scanning software. I have used VueScan for years with excellent results. My last scanner was a Canon Canoscan 9000 MK II – which I also liked. It scanned sizes up to 120. But mine died last year after only a couple of years of use, and they’re not being made anymore. This led me to look for better options, so I decided to try my hand at DSLR scanning. And I’m glad I did. Below, I’m going to outline what you’ll need to do something similar.
Digital Camera (DSLR or Mirrorless)
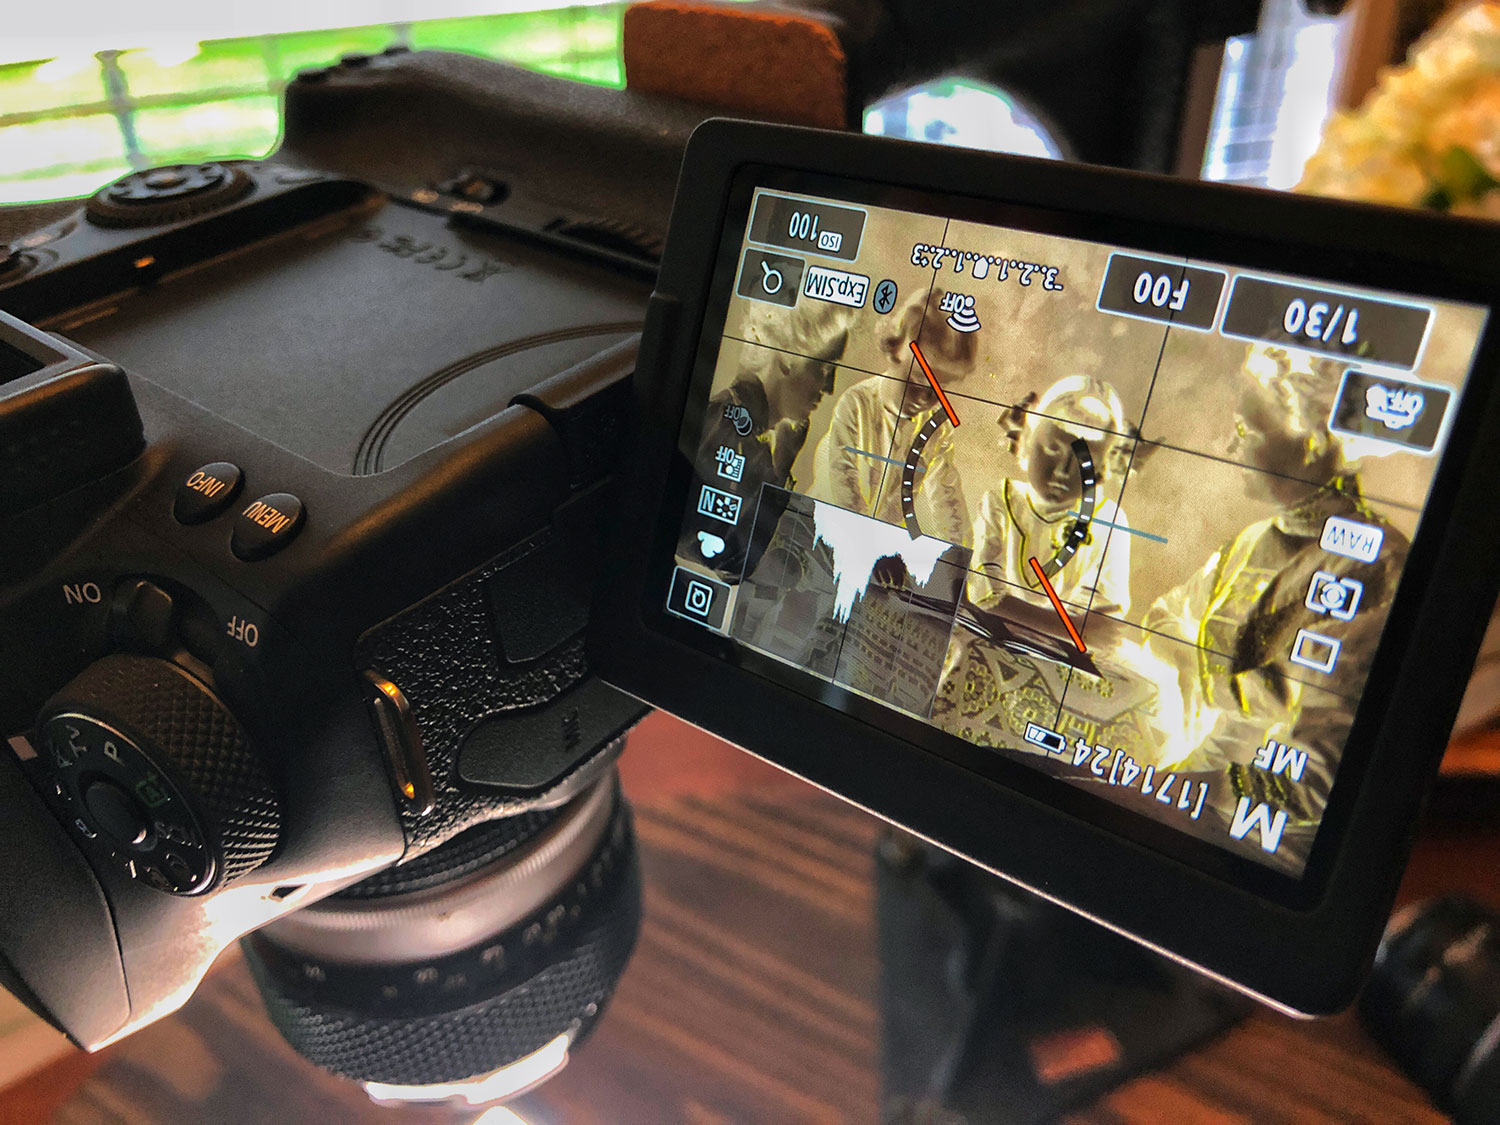
Obviously the most important piece of equipment for this. I’m currently using a Canon 90D for this, shooting RAW files of the largest size (32MP) available.
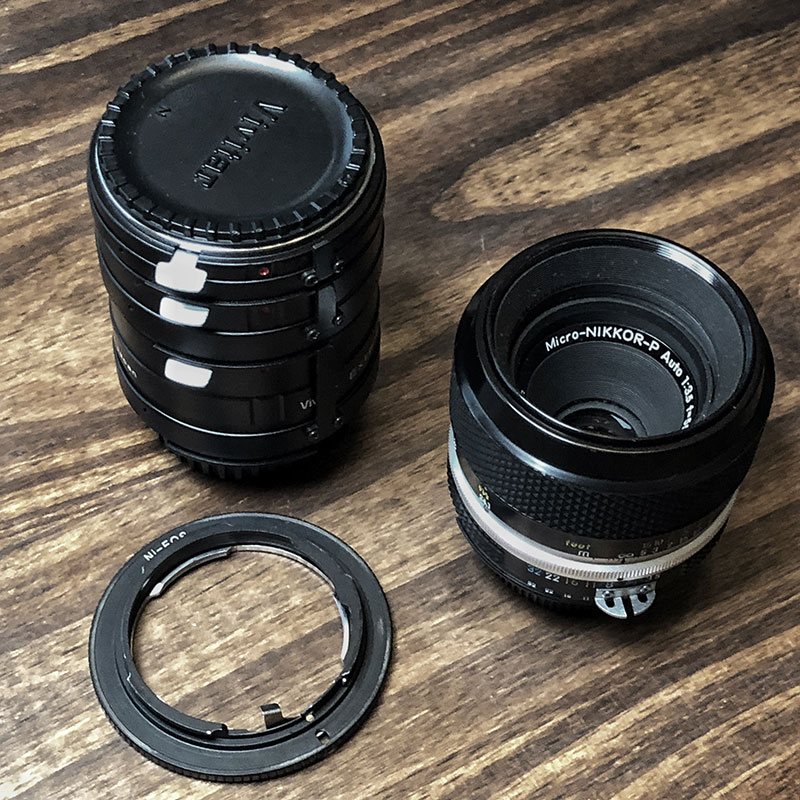
Macro Lens
Most normal lenses won’t allow you to focus close enough to fill the frame with a 35mm negative or slide, so a macro lens is usually a must-have. Currently, I have a Nikon AI’d 50mm 3.5 that I’ve adapted to my Canon body. Of course you can use a modern macro lens if you have it.
Now one of the benefits to shooting larger film – medium format, or even large format – is the increased resolution and detail these sizes allow. You can shoot the entire negative at once with this set-up. Or, you can get really close in and photograph sections of the image which you can assemble later in editing. For my medium format negatives, I usually shoot them in two sections. For my 4×5 negatives, I’ll shoot them in at least four sections. If you choose to do it this way, make sure you overlap each section you shoot. This will make it easier for the software to automatically merge all the sections. Hint: Be sure to leave the camera set at the same exposure for each section.
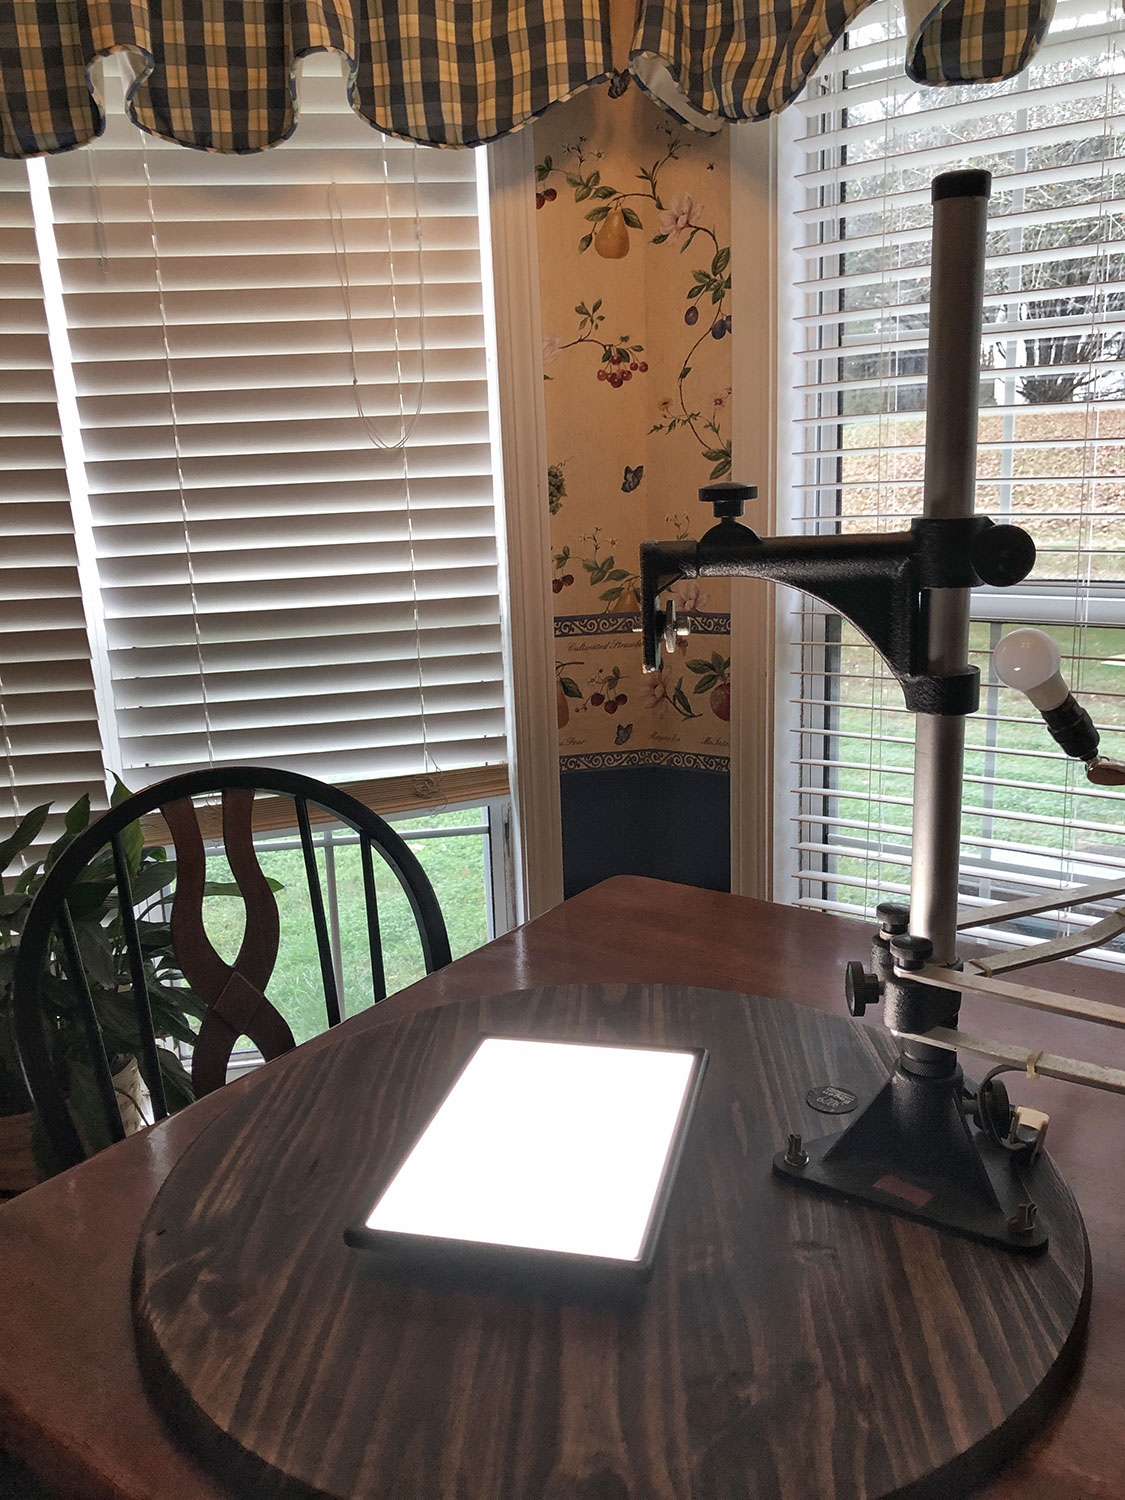
Copy Stand or similar
You’ll need a way to mount your camera so that it faces straight down and is parallel to the film. I have an old copy stand that works for this. The bottom (copy stage or table) was warped after sitting for years in a non-climate-controlled garage. A quick trip to Home Depot provided me with a small, round, pre-cut table top that should never warp.
Light Source
My current light source is a Raleno LED light. It’s light panel measures about 24cm X 16cm and is sufficiently large enough to evenly light a 5x7in large format negative. It’s also flat on the bottom, so it sits nice and parallel to the copy stage or table. One of the great things about this light is that it features a built-in diffusion panel instead of many rows of individual LEDs that will require you to add your own diffusion panel. If you already own an LED light without this diffusion panel, you’ll need to acquire a piece of frosted glass (or regular glass with frosted film) to spread the light evenly across the negative.
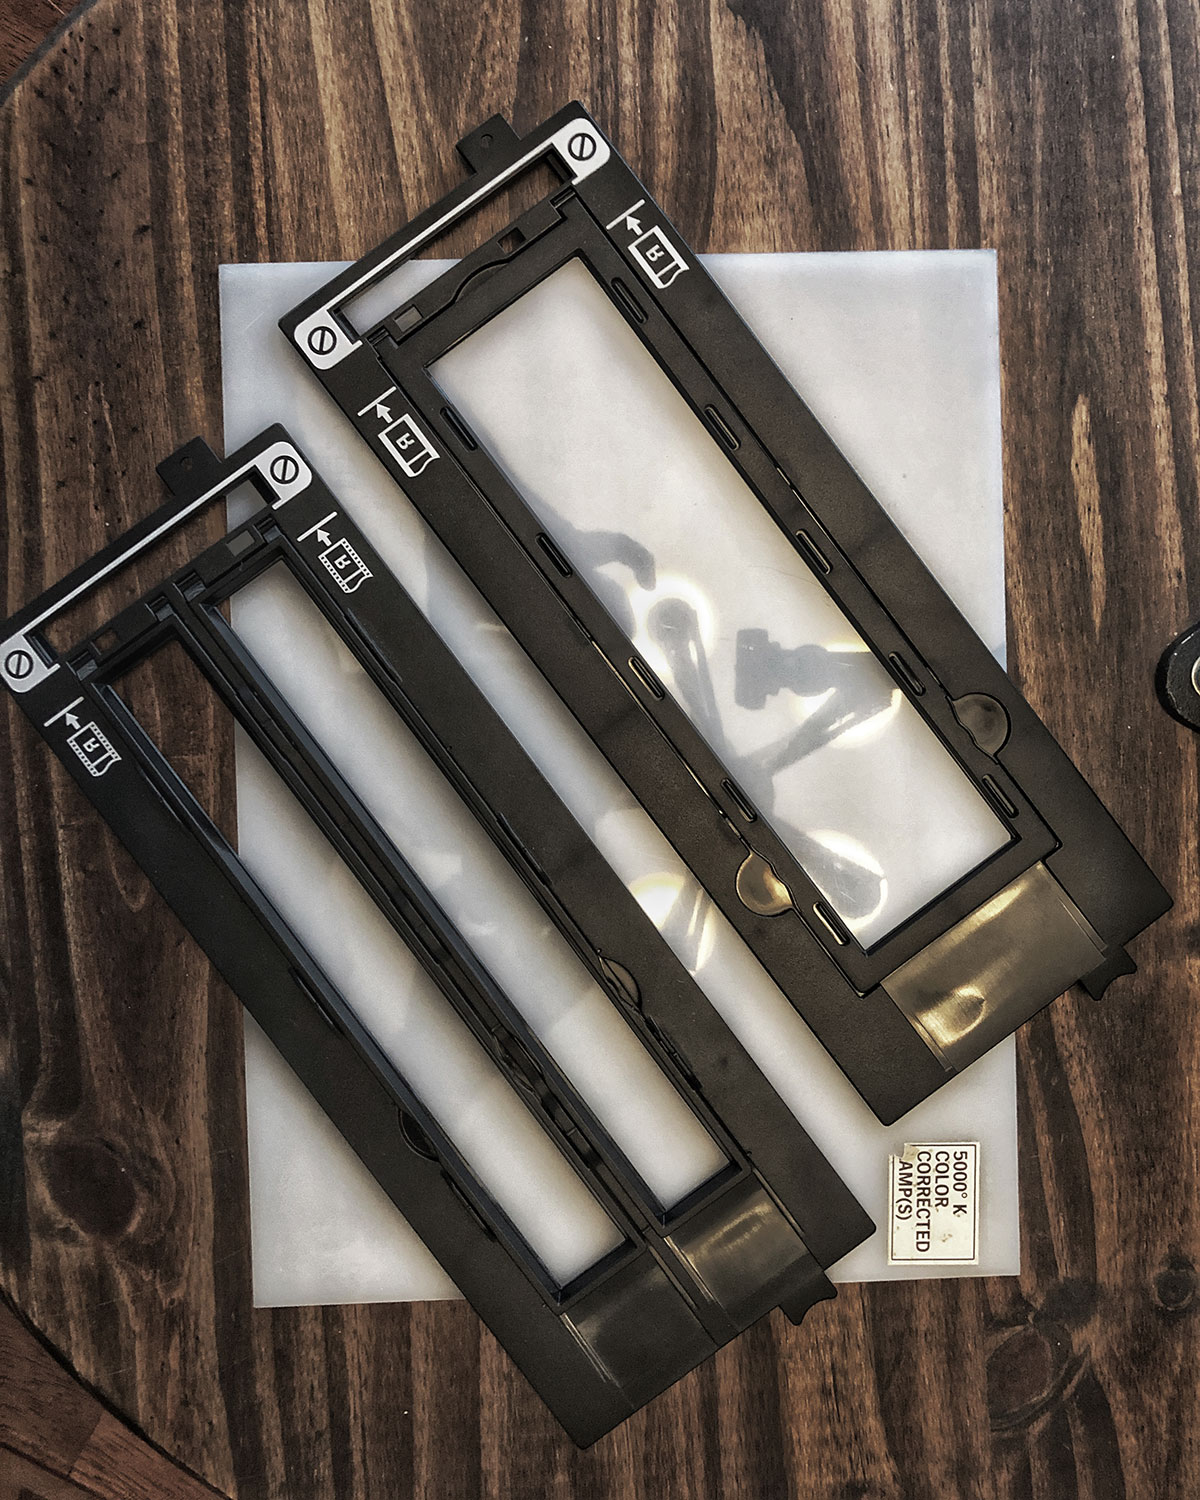
Film Holders
Most film will not just lay flat, unfortunately. Depending on humidity conditions while drying, film can easily curl up on its own. For this process to work correctly, you’ll need the film to lie perfectly flat. It’s technically possible to sandwich the film between two pieces of glass to keep it flat, but this can often lead to strange concentric circle shapes in the final image called Newton’s Rings. It occurs because of the reflection of light between the two surfaces – in this case, the two pieces of glass. To avoid this you can use special Anti-Newton glass (expensive), or buy an appropriate-size film holder (not expensive) for the size film you have. The holder will keep the film flat. Hint: You can also buy film holders for unusual film sizes (616, 818, 127, 110) that have been 3D printed from sellers on eBay.
Photoshop
This is the step that makes it all possible. Basically you’re taking a photo of the negative. Inverting the image in Photoshop converts it to a positive image where you can make your adjustments.
If you’ve shot multiple sections of the film and need to assemble it, Photoshop has a fantastic feature called Photomerge. This is usually used to automatically stitch together images to create panoramas. But in this case, it’s stitching together different sections of the same negative. Photoshop will accurately align the images to create one larger image which you can then invert to create the positive.
The Photomerge setting is found in File > Automate > Photomerge. You can then browse for the files you want to combine.
Summing it all up, this sounds like a lot to to hobble together just to digitize some film. And now that I’m writing it all down it does seem complicated. But it does have a couple of benefits over a stand-alone film scanner. Number one for me is the ability to get tack-sharp focus on the negative. Scanners and their imaging sensors have a pre-set focus based on how far the film/film holder is from the sensor. Although rare, I’ve experienced times when sharp focus was not achieved in the scan. In the method I’ve described here, I will use the Live View setting and zoom in to 10x magnification – which lets me focus on the actual film grain.
The second benefit is that this method isn’t an all-in-one solution that can die on you without the ability to replace it. Like with me and the Canon scanner. Before I tried using the DSLR for this, I was convinced I’d have to shell out $1200 for an Epson V850. The main tech here is the camera and Photoshop.
The one drawback with this method comes when scanning color negatives. Color film base color is orange. When you invert that as-is, your photos will have a STRONG blue cast that you will have to neutralize. Scanner software takes this into account and corrects for it during the scanning. But it’s not impossible to do in Photoshop. And there are plug-ins you can buy to do this for you if you can’t seem to get it right. Black and white film and color transparency film will give you no trouble at all.
Let me know what y’all think about this. Is this easier/better than a scanner? If you have any questions or comments don’t hesitate to shoot me an email. I’d love to hear about your exploits in film photography!

very interesting ! I work a lot with epson 850 I only use it for mediumformat for the moment .Now I am using a canon d60 with a slideduplicator and a sigma 50 mm macro and flash as a lightsource. I use it for 35 mm slides and 35 mm bw film. It is very fast method .
LikeLike
Thanks for the comment, Sten. I do like the Epson scanners for film. I previously did a lot of scanning with the older V750 at the university where I worked. Very good scans. Using the slide duplicator and a flash is also a great method. Simple and effective. I had forgotten that those slide copiers are even available still. But for 35mm work, that sounds like a much less complex way of doing it. Cheers!
LikeLike
cheers to the film 🍻
LikeLike