Useful Tool for Macro Photography?
So, when a dentist friend of mine was getting ready to retire, he was looking to get rid of this camera. I had seen them for sale in the ads in the back of old photo magazines for years, but I’d never seen one in person. So, I thought, what the heck? I’ll see what I can do with it.
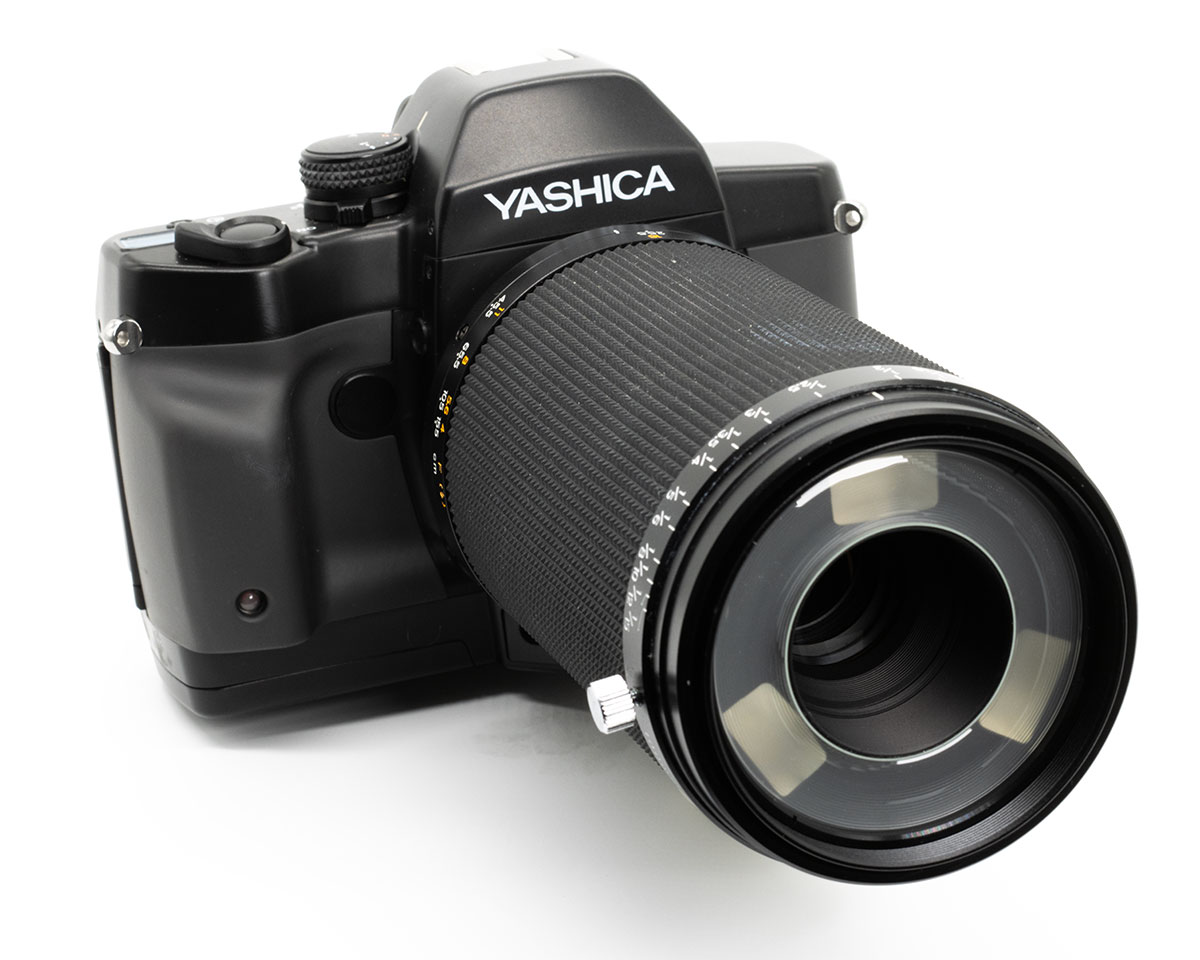
It’s a decent looking camera, I suppose. But the first thing you’ll notice is the massive lens – which is, by the way, non-interchangeable. But it’s a 100mm f/4 that’s capable of macro photography down to a 1:1 magnification. You’ll also notice that it has a ring-flash built into the housing. It’s also very important to mention right off that this lens will not focus to infinity. It’s for close-up use only. The farthest distance you’re able to focus is a little less than 2 meters or about 6 ft.
Now, everything about this camera EXCEPT focusing, is automatic. Film loading – automatic, film winding – automatic, film rewind – automatic. EXPOSURE? Yes, 100% automatic. There are no shutter speed or aperture controls. And film speed is set by DX-coding.
For a bit of a backstory (and what would one of my posts be without some backstory??) this is the third generation of the Dental Eye. The first camera specifically for dental use was the Oral-Eye – which was a modified Yashica Electro 35 rangefinder. Now, I can’t imagine how cumbersome that would’ve been to use. If you’ve seen my video on the regular Electro 35 you might remember that I had the close up attachment, and it wasn’t a walk in the park to use it. So, somewhere along the line, Yashica decided to build an SLR to make the job easier.
Well, actually they just took one of their existing SLRs – the FX-3 – and modified it. For the first version of the Dental Eye (which was 1983, I believe) they fitted the camera with a non-removable 55mm f/4 close-focusing lens, and they fixed the shutter speed at 1/125 sec. And apertures were set automatically based on the magnification ratio. The flash would always fire at full power, but the closer you got to the subject, the aperture would stop down to keep it from being over-exposed. This also helped with the depth of field at super-close distances.
The 2nd and 3rd generation of the camera swapped out the 55mm lens with a 100mm. Which allowed you to get a 1:1 magnification without getting so close to the patient.
As for controls on this 3rd version, well, it doesn’t have much. On the top right there’s the shutter release with the on/off switch around the base. What you’d expect to be a shutter speed dial is only an exposure compensation dial. And at the base of that is the flash setting switch.
Basically the only thing you can set on the camera is whether or not the flash fires and how many of the three units will do so. There’s no wind lever, film transport is automatic. You do have a small LCD panel that tells you if the film is loaded properly and what frame you’re on.
In the viewfinder, there’s no information at all except a green LED that shows that the flash is charged. That same LED will blink 6 times per second for a low light warning if the flash is turned off.
And the battery is a regular 2CR5 camera battery. So that’s pretty easy to find.
Now, behind the scenes, the specs are impressive enough. The shutter speed range is 16 secs all the way to 1/4000 sec. Flash sync is at 1/125 sec. And the aperture range is f/4 to f/22.
BUT – there are some serious limitations that come with using this thing. And the biggest one, for me, is that when you turn the flash off, the shutter speed is variable, but the aperture is locked at f/4. And when you’re doing macro work, you usually don’t want to shoot with the lens wide open since your depth of field is gonna be so thin.
Turning the flash on, will give you access to the other apertures – again, based on the magnification of the subject. But ring-flash lighting is going to make the subject look pretty flat. And it’s probably not the look you’ll be going after if you’re into macro work. It may be perfect for documenting teeth, but we’ll have to see how this translates to normal photography.
And that’s what we’re really testing here. Is this going to be a useful tool? Or is it something you should just pass on? Be sure to watch the video to find out!
